
Gutenbergプラグイン用のデータを永続化する
Gutenbergには store による状態管理を簡単に行う方法が用意されています。
さらにその状態をブラウザのローカルストレージに保持するための仕組みもあります。
設定を保存することで、より便利なプラグインを作成することが可能です。
ここではその使用方法を紹介します。
簡単なプラグインの作成
エディタの幅を設定するプラグインを作成してみます。
constant.js
プラグインで使用する定数を定義します。
export const PLUGIN_NAME = 'test-plugin';store/constant.js
store で使用する定数を定義します。
import { PLUGIN_NAME } from '../constant';

export const STORE_NAME = PLUGIN_NAME;
export const INITIALIZE = '@@' + PLUGIN_NAME + '/INITIALIZE';
export const SET_WIDTH = '@@' + PLUGIN_NAME + '/SET_WIDTH';
store/actions.js
store の actions を追加します。
import { INITIALIZE, SET_WIDTH } from './constant';

export function initialize() {
	return {
		type: INITIALIZE,
	};
}

export function setWidth( width ) {
	return {
		type: SET_WIDTH,
		width,
	};
}
initialize はブロックエディタを開いたときに、保存してある値を使用して幅を設定する際に使用します。
store/reducer.js
store の reducer を追加します。
SET_WIDTH では数値が渡された場合にのみ状態を変更し、幅の設定を行います。
import { INITIALIZE, SET_WIDTH } from './constant';

export default ( state = {
	width: false,
}, action ) => {
	switch ( action.type ) {
		case INITIALIZE:
			if ( state.width ) {
				setStyle( state.width );
			}
			break;
		case SET_WIDTH:
			if ( /^\d+$/.test( action.width ) ) {
				const newState = Object.assign( {}, state );
				newState.width = action.width;
				setStyle( action.width );
				return newState;
			}
			break;
	}
	return state;
};

function setStyle( width ) {
	const remove = document.getElementById( 'set-editor-width' );
	if ( remove ) {
		remove.remove();
	}

	const styleSheetElement = document.createElement( 'style' );
	styleSheetElement.id = 'set-editor-width';
	document.head.appendChild( styleSheetElement );
	const sheet = styleSheetElement.sheet;

	const styles = getStyles( width );
	Object.keys( styles ).forEach( selector => {
		const style = styles[ selector ];
		if ( sheet.insertRule ) {
			sheet.insertRule( `#editor ${ selector }` + '{' + style + '}', sheet.cssRules.length );
		} else {
			sheet.addRule( `#editor ${ selector }`, style );
		}
	} );
}

function getStyles( width ) {
	return {
		'.editor-writing-flow': `max-width: ${ width }px; width: auto; margin: auto`,
		'.wp-block': 'max-width: 100%; margin: 0 auto; padding: 0;',
	};
}
store/selectors.js
store の selectors を追加します。
getWidth は現在の width の状態を返します。
export function getWidth( state ) {
	return state.width && state.width > 0 ? state.width : '';
}
store/index.js
ここまでで追加した actions、reducer、selectors を使用して store を登録します。
そしてここが今回の肝となる部分です。
const { registerStore } = wp.data;
import reducer from './reducer';
import * as selectors from './selectors';
import * as actions from './actions';
import { STORE_NAME } from './constant';
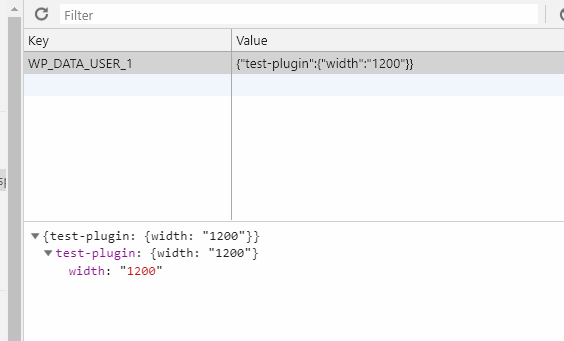
registerStore( STORE_NAME, { reducer, selectors, actions, persist: [ 'width' ] } );保持したい値を persist で指定します。
これによってブラウザのローカルストレージに値が保存され、リロード等を行っても値が保持されるようになります。
components/set-editor-width.js
値の入力方法を提供するためのコンポーネントを作成します。
今回は簡単にするため prompt で入力するようにしています。
const { Fragment } = wp.element;
const { PluginMoreMenuItem } = wp.editPost;
const { withSelect, withDispatch } = wp.data;
const { compose } = wp.compose;

import { STORE_NAME } from '../store/constant';

function SetEditorWidth( { setWidth } ) {
	return <Fragment>
		<PluginMoreMenuItem
			onClick={ setWidth }
		>
			エディタ幅設定
		</PluginMoreMenuItem>
	</Fragment>;
}

export default compose(
	withSelect( select => {
		return {
			width: select( STORE_NAME ).getWidth(),
		};
	} ),
	withDispatch( ( dispatch, { width } ) => {
		return {
			setWidth: () => dispatch( STORE_NAME ).setWidth( prompt( '設定したい幅を入力(px)', width ) ),
		};
	} ),
)( SetEditorWidth );
components/index.js
import SetEditorWidth from './set-editor-width';

export { SetEditorWidth };
index.js
ここまでで追加した要素を使用してプラグインの登録と初期の動作を設定します。
const { registerPlugin } = wp.plugins;
const { dispatch } = wp.data;

import './store';
import { STORE_NAME } from './store/constant';
import { SetEditorWidth } from './components';

registerPlugin( 'my-test-plugin', {
	render: () => <SetEditorWidth/>,
} );

wp.domReady( function() {
	dispatch( STORE_NAME ).initialize();
} );
動作確認
リロード後も幅が保持されることが確認できました。
Makefile で 動的にコマンドを変える方法